This issue varies from your monitor flashing on and off in an interval of seconds to days where your monitor won’t turn on at all. And to top it all off, there is no error prompts on the screen that you could focus on. However, we do know that this issue you are facing is either caused by driver problems or hardware malfunctions. This guide shall take you through all the steps and help you understand the basics, to effortlessly light your second screen back up. Continue this guide till the end and leave your valuable feedback. So, let’s get straight to the point.
Why Is My Second Monitor Going Black?
There are many factors that determine the workflow within your monitor. Even though connecting a second screen is a simple procedure, some things still lead to errors and failures.
Here’s How to Fix Your Second Monitor Going Black
The second monitor returning a black screen is not a very rare situation. That is why the fixes to your issue are simple and straightforward. Just be sure to try each method listed below until you reach the one that solves the problem for you. The following steps are done by taking Windows 11 as a reference, however, similar steps can be followed for other versions of Windows OS as well.
Ensure That There Are No Hardware Malfunctions
Before you dive into technical fixes, check to see if there are any possible hardware malfunctions in your device. Ensure that the cables you are using to connect the second screen work properly. So, swap out the cables and the connection methods to ensure that there is nothing out of the ordinary. Furthermore, try connecting the second monitor to an individual system and determine if there is any problem within the monitor itself. Also, you can try restarting the graphics driver to see if your system is responsive or not. A key combination of Win + Ctrl + Shift + B shall restart the driver and return back a beep sound if it is responsive.
Ensure That The Cables Are Firmly Connected
Once know that there are no hardware malfunctions on any of your devices, the next step is to ensure that the cables are plugged in the right way. So, to rule out the issue of loose and misconfigured cables, you can casually unplug your monitor and firmly plug it back on again. Make sure that the connection methods (HDMI, DisplayPort) you plan on using are not damaged in any way whatsoever.
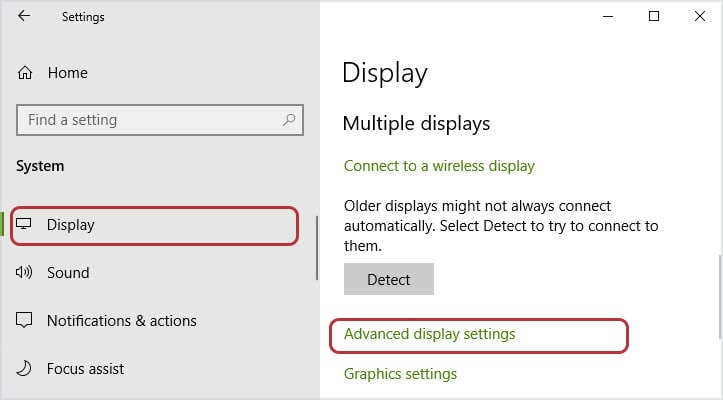
Adjust Your Monitor’s Refresh Rate
Th refresh rate of your monitor indicates the rate at which images are refreshed on the screen. You can change the refresh rate by changing your monitor’s frequency. Most monitors work on 60Hz frequency, however, high-end ones can have a frequency of up to 240Hz. A compatible refresh rate can make or break the second screen connected to your system and hence, your primary as well as the secondary screens should have the same frequency. So, for this,
Update Your Graphics Driver
A fully functioning monitor requires the latest and greatest graphics drivers installed on your computer. This is because a graphics/video driver is responsible for directing your system to interact with its graphic component in the most efficient manner. Hence, an outdated graphics driver can cause corruption and compatibility issues when a second screen is connected to the system. So, you can update the graphics driver to try and fix your problem. Here are the steps to do so:
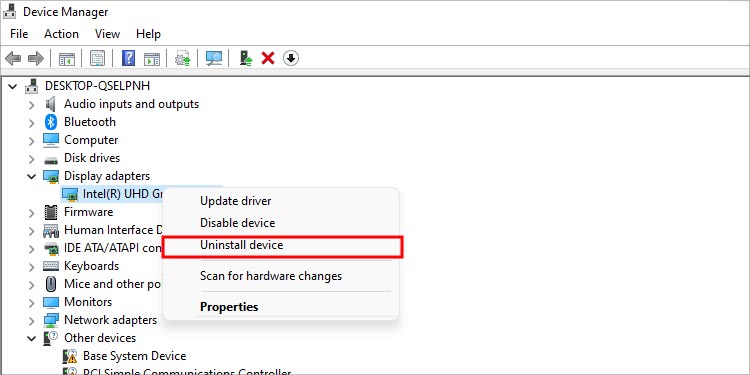
Reinstall Your Graphics Driver
If updating your driver doesn’t seem to fix the issue, a complete reinstall could. Reinstalling a video driver deletes previously installed buggy files and sets up new ones. This can free a significant amount of memory, make your system smoother and even fix your second monitor issue. You can follow these steps to do so:
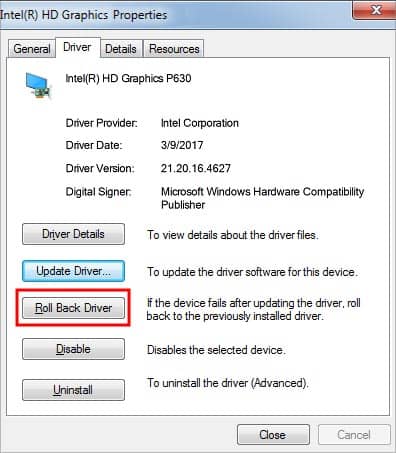
Rollback Your Graphics Driver
At times, new driver updates turn out to be incompatible. So, in this case, rolling back your graphics driver to the previous build can fix issues caused by the new buggy install. Hence, if your second monitor started showing issues after you updated the graphics driver, you can roll back the update to revert the issues and solve your problem. The steps below show you how to do it.
Perform a Clean Boot of the System
Conflicting applications often cause your second monitor to glitch out. Programs running in the background can interfere with your system’s workflow and resource sharing feature to return the issue youre facing. Hence, in this case, a clean boot could help you determine which application is interfering with your monitor. Here’s how to do so: If your second monitor still doesn’t light up, there is no interference from third-party applications.However, if you notice your second monitor running smoothly, then you have to figure out which application is interfering with your monitor. So, in this case, repeat the aforementioned steps to disable each application bit by bit to figure out which is the conflicting one.
Configure Your Power Options
Power saving mode is often known to stutter monitors and cause it to go black. So, the problem with your second monitor failing to light up could be as simple as an incompatible power option. So, configuring it might fix your issue. For this,
Disable the Screensaver
To prevent any more disorientation during these times of confusion, its smart to turn off your monitor’s screensaver. Screensaver could also add a few minor glitches on top of your black screen issue. So, you can disable it by following the steps shown below:
Restart Windows Explorer
If and when your system is unresponsive and misbehaving, you can restart the Windows Explorer to try and fix your problem. As Windows explorer can be used to manage all data and resources of your system, it can very well help your monitor light back up. So for this,
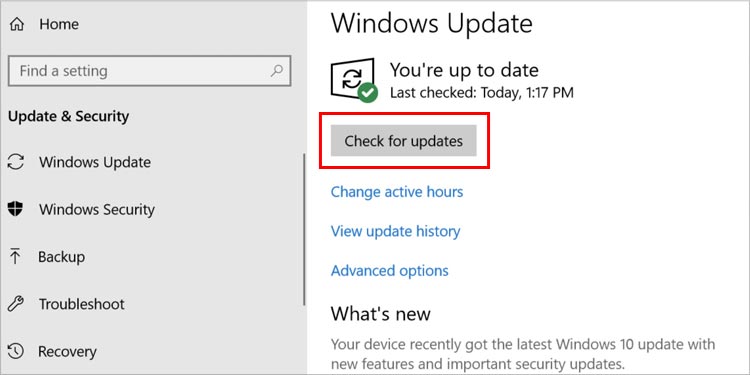
Install all windows updates
Outdated Windows build is known to cause incompatibilities within your system and could hence affect your second monitor as well. So, installing the latest Windows updates can fix these type of bugs and glitches in the system. Your second screen could be up and running in no time. So,
Factory Reset Your Monitor
If nothing works, then you can try to factory reset your monitor. Factory resetting your monitor makes it feel as if its right out of the box. However, doing so will erase your monitor’s settings that you might have customized and return it back to default. This includes the image ratio, contrast and brightness that you might have set, among other things. The exact key configuration to factory reset a monitor is different for different brands and models. So, play around with the monitor’s keys and access the display settings within it to efficiently reset your screen. Also, you can visit your device manufacturer’s webiste to view the exact button configuration for you system and make things easier for you.